.png?width=200&height=80&name=Classic%20Experience%20(1).png)
Connect Cascade to thousands of other apps with Zapier
Zapier lets you connect Cascade to thousands of other platforms. Automated connections called Zaps, set up in minutes with no coding skills required, can automate your day-to-day tasks and build workflows between apps that otherwise wouldn't be possible.
Each Zap has one app as the Trigger, where your information comes from and which causes one or more Actions in other apps, where your data gets sent automatically.
Getting Started with Zapier
Sign up for a free Zapier account, from there you can jump right in.
How do I connect APP to Zapier?
-
Log in to your Zapier account or create a new account.
-
Navigate to "Connected Accounts" from the top menu bar.
-
Now click on "Connect new account" and search for "Cascade"
-
Use your credentials to connect your Cascade account to Zapier.
-
Once that's done you can start creating an automation! Use a pre-made Zap or create your own with the Zap Editor. Creating a Zap requires no coding knowledge and you'll be walked step-by-step through the setup.
-
Need inspiration? See everything that's possible with Cascade and Zapier.
From your Cascade account, navigate to your initials (in the bottom left corner of the page) > Integrations, you can find some popular templates that Cascade users integrate with Cascade using Zapier. Click on the apps that you would like to connect to use the template.
Supported Zapier Triggers
Our Zapier integration currently supports the following triggers:
-
New Goal
-
New Task
-
Goal Changed
-
New Issue
-
New Update Added To Goal
-
Milestone Changed
Supported Zapier Actions
Our Zapier integration currently supports the following actions:
-
Update Goal
-
Create Goal
-
Create Task
-
Create Goal History
-
Update Task
-
Update Risk
-
Create Risk
-
Create Update
-
Find Goal
If there are additional triggers or actions that you would like to see us support, please let us know via live chat.
Template Support
You can set and edit the template associated with an item that you're creating or updating.
Note that if you create or change an item to a new template, you must set any mandatory Custom Fields (see below) associated with the template, otherwise the operation will fail. This is to ensure that even items which are added or changed via Zapier respect the mandatory field settings specified on the template.
Custom Field Support
Custom Fields are supported in most triggers and actions, however due to the high degree of flexibility that Cascade provides for Custom Fields, you will need to have an understanding of how this works to effectively use them via Zapier.
The essence of our Custom Field support in Zapier is that you need to utilize the 'Reference ID' that is associated with each Custom Field:
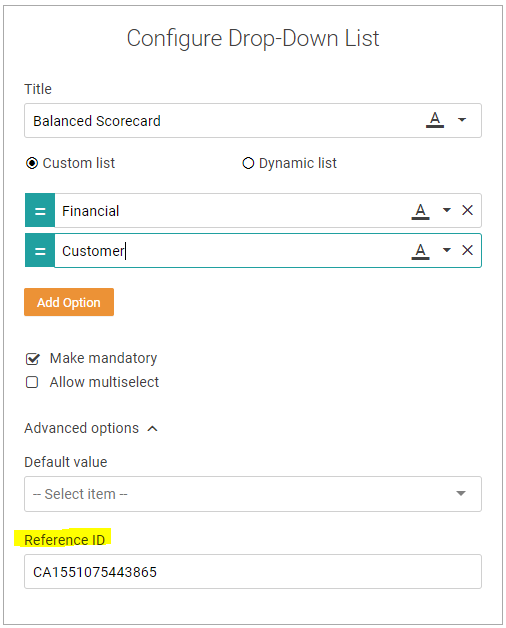
If you want to set any Custom Field via Zapier, you will need to use this Reference ID along with the value that you want to set for the Goal you are creating / changing.
Every type of Custom Field is supported with the exception of Formulas (since Formulas are not editable fields at the Goal level).
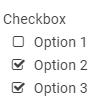
Note that whilst you can make changes to individual Custom Fields without affecting the other Custom Fields present on an item, some types of Custom Field require you to specify all values. For example, the 'Checkbox' Custom Field is treated as a single field, therefore you cannot 'append' a selection to a checkbox field. Instead you must specify all the checked items in one single request. For example, to specify the following via Zapier:
You need to send a value of:
Option 2|Option 3
Notice the ' | ' symbol between the two values. Now, let's say that you successfully set the checkbox field to Option 2 and Option 3, then wanted to also check Option 1:
If you were to send the following:
Option 1
This would result in only Option 1 being checked, and Option 2 and Option 3 would be unchecked. This is because you must send the checkbox field as a complete data set, in other words, you would need to send:
Option1|Option 2|Option 3
This same logic applies to any single field - the entirety of the values for that field must be set with every request.