Cascade Progress Update Integration
Automating progress updates in Cascade starts with using a simple, standard CSV document that maps goal data from your systems to corresponding Goal IDs in Cascade.
The easiest way to find Goal IDs is by using the "Goal ID" column in either Snapshots (any user) or Bulk Edits (admins)
NOTE: This setup will very likely require technical support on your end.
Stages in the Update Process
Essentially there are 3 stages:
-
The source system generates data - You generate csv formatted information from the source systems, to a specified format following certain rules.
-
The transfer is triggered at source - Use your preferred toolset to transfer the data to a URL we provide, following certain format rules.
-
Cascade picks up the data and performs the update
Required Format
You need to export csv formatted data from the source system (see the example below) - we've kept the format and necessary fields as simple as possible:
-
Goal Id - Cascade Goal Id
-
Date - Date for which to apply the progress update (in YYYY-MM-DD format)
-
Progress - The value of the progress update (note that this is the "total" progress as you'd see it in Cascade, not an "incremental" value)
Example:
You have Goals in Cascade you'd like to update from your financial system:
-
Cascade Goal Id 23 - your revenue YTD
-
Cascade Goal Id 57 - your 30 invoice payment rate (%)
-
Cascade Goal Id 62 - your total number of active clients
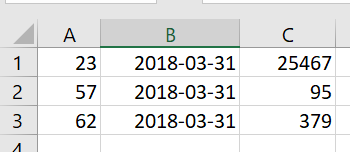
On e.g. 3rd April, your system automatically exports the month-end figures for March. The csv formatted information would like this if you opened it in Excel:
Or like this as raw comma-delimited data:
23,2018-03-31,25467
57,2018-03-31,95
62,2018-03-31,379
Other Format/Content Rules
The basic rules are:
-
1 "row" per progress update - you can have 1 or many rows, and even include multiple updates for the same Goal if you wish.
-
Only include the "new" updates - i.e. this is not a cumulative file of all the progress updates ever made via this process, it's just the new stuff.
-
You can do updates from as many different systems as you like - they don't have to be "packaged." For example, you can have a monthly update from Xero updating 3 financial Goals, a daily update from your web analytics with website traffic, and a real-time update from your CRM with total client numbers. All of these data can be routed through the same simple CSV document.
You will need to establish how to insert the Goal IDs into the process:
-
You may want to add them as custom attributes in the source system and just make them part of the exported dataset, or you could put them in a mapping table somewhere and build it in to the export script, etc.
-
How you do this is completely up to you - Cascade is indifferent to which approach you use, as long as the resulting data are the same.
The export can be automated or manual, and can be run as often as you like.
Transfer Mechanism
The mechanism for transferring the data is by uploading the data file through an API endpoint specific to the Cascade instance.
-
API Endpoint: https://[instanceName].executestrategy.net/api/v2/importers/goal_progress/upload
-
The endpoint requires an authorization token which you can generate yourself by going to Admin > System > Security then clicking 'Add Token'.
A PUT request with a payload containing the contents of the file is to be sent to the endpoint. You will need to have some form of tool to convert your CSV data in to the payload of the request that will be sent to the upload endpoint.
-
You can use any tool you like to do the job, as long as the resulting request is as described above. For example, cURL is a free tool that is widely known and used for this type of activity https://curl.haxx.se/.
Examples
cURL: curl -L -T test.csv https://[instanceName].executestrategy.net/api/v2/importers/goal_progress/upload --header "Authorization: Bearer TOKEN"
Troubleshooting
Issue with SSL verification: Please ensure that you are using TLS 1.2 as Cascade only supports TLS 1.2+
.png?width=200&height=80&name=Classic%20Experience%20(1).png)
